SpringSecurity笔记
SpringSecurity权限验证是通过一系列的过滤器(Filter)来实现的,但从容器的角度来看在过滤链中它表现为一个Filter,其类型是FilterChainProxy。换句话说,SpringSecurity是一个单独的物理过滤器,但是它将请求委托给一系列的内部过滤器,如下图所示:
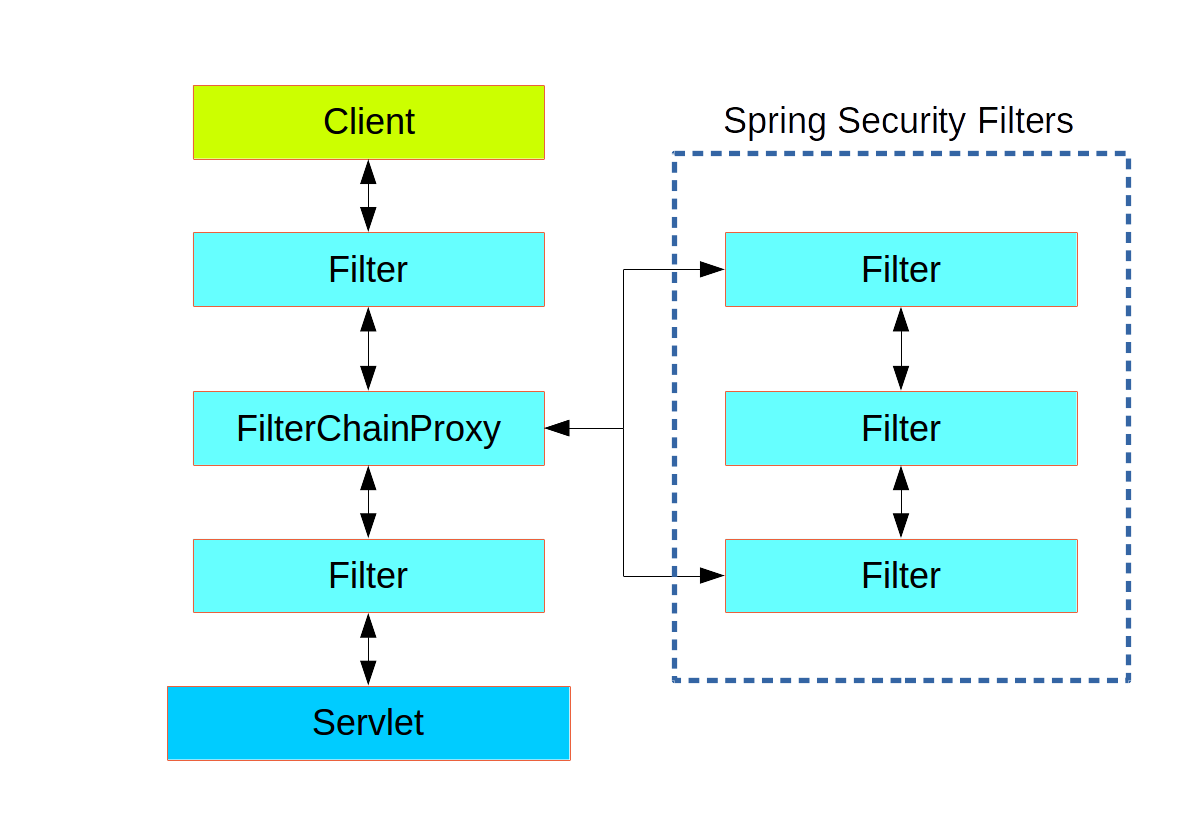
SpringSecurity的内部过滤器链如下:
| 别名 | 类名称 | Namespace Element or Attribute |
|---|---|---|
| CHANNEL_FILTER | ChannelProcessingFilter | http/intercept-url@requires-channel |
| SECURITY_CONTEXT_FILTER | SecurityContextPersistenceFilter | http |
| CONCURRENT_SESSION_FILTER | ConcurrentSessionFilter | session-management/concurrency-control |
| HEADERS_FILTER | HeaderWriterFilter | http/headers |
| CSRF_FILTER | CsrfFilter | http/csrf |
| LOGOUT_FILTER | LogoutFilter | http/logout |
| X509_FILTER | X509AuthenticationFilter | http/x509 |
| PRE_AUTH_FILTER | AbstractPreAuthenticatedProcessingFilter( Subclasses) | N/A |
| CAS_FILTER | CasAuthenticationFilter | N/A |
| FORM_LOGIN_FILTER | UsernamePasswordAuthenticationFilter | http/form-login |
| BASIC_AUTH_FILTER | BasicAuthenticationFilter | http/http-basic |
| SERVLET_API_SUPPORT_FILTER | SecurityContextHolderAwareRequestFilter | http/@servlet-api-provision |
| JAAS_API_SUPPORT_FILTER | JaasApiIntegrationFilter | http/@jaas-api-provision |
| REMEMBER_ME_FILTER | RememberMeAuthenticationFilter | http/remember-me |
| ANONYMOUS_FILTER | AnonymousAuthenticationFilter | http/anonymous |
| SESSION_MANAGEMENT_FILTER | SessionManagementFilter | session-management |
| EXCEPTION_TRANSLATION_FILTER | ExceptionTranslationFilter | http |
| FILTER_SECURITY_INTERCEPTOR | FilterSecurityInterceptor | http |
| SWITCH_USER_FILTER | SwitchUserFilter | N/A |
过滤器的过滤顺序自上而下,按顺序执行。
基于数据库的登入认证
spring security基于数据库的登录认证使用的默认过滤器为UsernamePasswordAuthenticationFilter类,该类继承自AbstractAuthenticationProcessingFilter抽象类。
AbstractAuthenticationProcessingFilter抽象类通过doFilter封装了登入认证的基本逻辑,子类实现其中的抽象方法进行认证,该类doFilter方法如下:
/**
     * 调用 #requiresAuthentication(HttpServletRequest, HttpServletResponse) 决定是否需要进行验证操作。
     * 如果需要验证,则会调用 #attemptAuthentication(HttpServletRequest, HttpServletResponse) 方法。
     * 有三种结果:
     * 1、返回一个 Authentication 对象。
     * 配置的 SessionAuthenticationStrategy` 将被调用,
     * 然后 然后调用 #successfulAuthentication(HttpServletRequest,HttpServletResponse,FilterChain,Authentication) 方法。
     * 2、验证时发生 AuthenticationException。
     * #unsuccessfulAuthentication(HttpServletRequest, HttpServletResponse, AuthenticationException) 方法将被调用。
     * 3、返回Null,表示身份验证不完整。假设子类做了一些必要的工作(如重定向)来继续处理验证,方法将立即返回。
     * 假设后一个请求将被这种方法接收,其中返回的Authentication对象不为空。
     */
    public void doFilter(ServletRequest req, ServletResponse res, FilterChain chain)
            throws IOException, ServletException {

        HttpServletRequest request = (HttpServletRequest) req;
        HttpServletResponse response = (HttpServletResponse) res;

        //判断是否要进行验证,即判断url是否为"/login"(你设置的登入url)并且请求方法是否为post
        if (!requiresAuthentication(request, response)) {
            chain.doFilter(request, response);

            return;
        }

        if (logger.isDebugEnabled()) {
            logger.debug("Request is to process authentication");
        }

        Authentication authResult;

        try {
            //该方法为抽象方法由子类实现
            authResult = attemptAuthentication(request, response);
            if (authResult == null) {
                // return immediately as subclass has indicated that it hasn't completed
                // authentication
                return;
            }
            sessionStrategy.onAuthentication(authResult, request, response);
        }
        catch (InternalAuthenticationServiceException failed) {
            logger.error(
                    "An internal error occurred while trying to authenticate the user.",
                    failed);
            unsuccessfulAuthentication(request, response, failed);

            return;
        }
        catch (AuthenticationException failed) {
            // Authentication failed
            unsuccessfulAuthentication(request, response, failed);

            return;
        }

        // Authentication success
        if (continueChainBeforeSuccessfulAuthentication) {
            chain.doFilter(request, response);
        }

        successfulAuthentication(request, response, chain, authResult);
    }
上文提到了AbstractAuthenticationProcessingFilter抽象类在SpringSecurity的默认实现为UsernamePasswordAuthenticationFilter,因此将调用的UsernamePasswordAuthenticationFilter类的#attemptAuthentication方法,该方法主要作用是提取request中的账户(username)和密码(password)属性生成 UsernamePasswordAuthenticationToken 对象,交给AuthenticationManager 进行验证(即调用this.getAuthenticationManager().authenticate(authRequest) )。代码如下:
public Authentication attemptAuthentication(HttpServletRequest request,
            HttpServletResponse response) throws AuthenticationException {
        if (postOnly && !request.getMethod().equals("POST")) {
            throw new AuthenticationServiceException(
                    "Authentication method not supported: " + request.getMethod());
        }

        //从request中获得账户和密码
        String username = obtainUsername(request);
        String password = obtainPassword(request);

        if (username == null) {
            username = "";
        }

        if (password == null) {
            password = "";
        }

        // 删除头尾的空格
        username = username.trim();

        UsernamePasswordAuthenticationToken authRequest = new UsernamePasswordAuthenticationToken(
                username, password);

        // Allow subclasses to set the "details" property
        setDetails(request, authRequest);

        return this.getAuthenticationManager().authenticate(authRequest);
    }
在默认情况下UsernamePasswordAuthenticationFilter类持有的AuthenticationManager实例对象为ProviderManager,该类的#authenticate方法遍历所有的AuthenticationProvider,并选择符合条件的Provider调用其验证方法。代码如下:
/**
     * 尝试验证 Authentication 对象
     * AuthenticationProvider 列表将被连续尝试,直到 AuthenticationProvider 表示它能够认证传递的过来的Authentication 对象。然后将使用该 AuthenticationProvider 尝试身份验证。
     * 如果有多个 AuthenticationProvider 支持验证传递过来的Authentication 对象,那么由第一个来确定结果,覆盖早期支持AuthenticationProviders 所引发的任何可能的AuthenticationException。 成功验证后,将不会尝试后续的AuthenticationProvider。
     * 如果最后所有的 AuthenticationProviders 都没有成功验证 Authentication 对象,将抛出 AuthenticationException。
     */
public Authentication authenticate(Authentication authentication)
    throws AuthenticationException {
    Class<? extends Authentication> toTest = authentication.getClass();
    AuthenticationException lastException = null;
    Authentication result = null;
    boolean debug = logger.isDebugEnabled();

    for (AuthenticationProvider provider : getProviders()) {
        if (!provider.supports(toTest)) {
            continue;
        }

        if (debug) {
            logger.debug("Authentication attempt using "
                         + provider.getClass().getName());
        }

        try {
            result = provider.authenticate(authentication);

            if (result != null) {
                copyDetails(authentication, result);
                break;
            }
        }
        catch (AccountStatusException e) {
            prepareException(e, authentication);
            // SEC-546: Avoid polling additional providers if auth failure is due to
            // invalid account status
            throw e;
        }
        catch (InternalAuthenticationServiceException e) {
            prepareException(e, authentication);
            throw e;
        }
        catch (AuthenticationException e) {
            lastException = e;
        }
    }

    if (result == null && parent != null) {
        // Allow the parent to try.
        try {
            result = parent.authenticate(authentication);
        }
        catch (ProviderNotFoundException e) {
            // ignore as we will throw below if no other exception occurred prior to
            // calling parent and the parent
            // may throw ProviderNotFound even though a provider in the child already
            // handled the request
        }
        catch (AuthenticationException e) {
            lastException = e;
        }
    }

    if (result != null) {
        if (eraseCredentialsAfterAuthentication
            && (result instanceof CredentialsContainer)) {
            // Authentication is complete. Remove credentials and other secret data
            // from authentication
            ((CredentialsContainer) result).eraseCredentials();
        }

        eventPublisher.publishAuthenticationSuccess(result);
        return result;
    }

    // Parent was null, or didn't authenticate (or throw an exception).

    if (lastException == null) {
        lastException = new ProviderNotFoundException(messages.getMessage(
            "ProviderManager.providerNotFound",
            new Object[] { toTest.getName() },
            "No AuthenticationProvider found for {0}"));
    }

    prepareException(lastException, authentication);

    throw lastException;
}
通过上面的代码可以看出,验证的核心代码为:
result = provider.authenticate(authentication);
SpringSecurity中处理UsernamePasswordAuthenticationToken的AuthenticationProvider是抽象类AbstractUserDetailsAuthenticationProvider的子类,该类的#authenticate方法代码如下:
// 验证 authentication
public Authentication authenticate(Authentication authentication)
            throws AuthenticationException {
        Assert.isInstanceOf(UsernamePasswordAuthenticationToken.class, authentication,
                messages.getMessage(
                        "AbstractUserDetailsAuthenticationProvider.onlySupports",
                        "Only UsernamePasswordAuthenticationToken is supported"));

        // Determine username
        String username = (authentication.getPrincipal() == null) ? "NONE_PROVIDED"
                : authentication.getName();

        boolean cacheWasUsed = true;
        //这里使用了缓存机制,先在缓存中查找用户是否存在(默认缓存为NullUserCache,即不做缓存)
        UserDetails user = this.userCache.getUserFromCache(username);

        if (user == null) {
            cacheWasUsed = false;

            try {
                //如果用户不存在则调用retrieveUser方法
                //retrieveUser方法为抽象方法,由子类实现
                user = retrieveUser(username,
                        (UsernamePasswordAuthenticationToken) authentication);
            }
            catch (UsernameNotFoundException notFound) {
                logger.debug("User '" + username + "' not found");

                if (hideUserNotFoundExceptions) {
                    throw new BadCredentialsException(messages.getMessage(
                            "AbstractUserDetailsAuthenticationProvider.badCredentials",
                            "Bad credentials"));
                }
                else {
                    throw notFound;
                }
            }

            Assert.notNull(user,
                    "retrieveUser returned null - a violation of the interface contract");
        }

        try {
            preAuthenticationChecks.check(user);
            additionalAuthenticationChecks(user,
                    (UsernamePasswordAuthenticationToken) authentication);
        }
        catch (AuthenticationException exception) {
            if (cacheWasUsed) {
                //这里涉及到一个问题
                //从缓存中获得的用户可能不是最新的用户信息,因此在验证失败后还会进行一次验证
                cacheWasUsed = false;
                user = retrieveUser(username,
                        (UsernamePasswordAuthenticationToken) authentication);
                preAuthenticationChecks.check(user);
                additionalAuthenticationChecks(user,
                        (UsernamePasswordAuthenticationToken) authentication);
            }
            else {
                throw exception;
            }
        }

        postAuthenticationChecks.check(user);

        if (!cacheWasUsed) {
            this.userCache.putUserInCache(user);
        }

        Object principalToReturn = user;

        if (forcePrincipalAsString) {
            principalToReturn = user.getUsername();
        }

        return createSuccessAuthentication(principalToReturn, authentication, user);
    }
从上面的代码可以看出AbstractUserDetailsAuthenticationProvider使用了缓存机制,现在缓存中获取用户,如果用户不存在则调用#retrieveUser获得,然后再与传入的用户信息进行比对。这里有一点需要注意,在验证失败后SpringSecurity又进行了一次验证,目的是防止缓存中的信息过时。
其中的#retrieveUser方法为抽象方法,在SpringSecurity中由AbstractUserDetailsAuthenticationProvider的默认子类DaoAuthenticationProvider实现。代码如下:
protected final UserDetails retrieveUser(String username,
                                         UsernamePasswordAuthenticationToken authentication)
    throws AuthenticationException {
    UserDetails loadedUser;

    try {
        //调用UserDetailsService的loadUserByUsername方法从数据库获得用户
        loadedUser = this.getUserDetailsService().loadUserByUsername(username);
    }
    catch (UsernameNotFoundException notFound) {
        if (authentication.getCredentials() != null) {
            String presentedPassword = authentication.getCredentials().toString();
            passwordEncoder.isPasswordValid(userNotFoundEncodedPassword,
                                            presentedPassword, null);
        }
        throw notFound;
    }
    catch (Exception repositoryProblem) {
        throw new InternalAuthenticationServiceException(
            repositoryProblem.getMessage(), repositoryProblem);
    }

    if (loadedUser == null) {
        throw new InternalAuthenticationServiceException(
            "UserDetailsService returned null, which is an interface contract violation");
    }
    return loadedUser;
}
可以看出此处的返回对象 userDetails 是由 UserDetailsService 的 #loadUserByUsername(username) 来获取的。而UserDetailsService又是从何而来呢?实际上,UserDetailsService 是在SpringSecurity相关配置中定义的,下文会使用简单的例子进行说明。
在Spring-boot中使用SpringSecurity进行基于数据库的登入认证
首先,在pom.xml文件中添加SpringSecurity依赖,如下:
<dependencies>
    ...
        <dependency>
            <groupId>org.springframework.boot</groupId>
            <artifactId>spring-boot-starter-security</artifactId>
        </dependency>
    ...
</dependencies>
接着,对SpringSecurity进行配置,需要注意一下几点:
- 在Spring-boot中使用SpringSecurity需要使用@EnableWebSecurity注解,该注解需要配合@Configuration一起使用,用来标注SpringSecurity的配置类。
- SpringSecurity配置类需要实现
WebSecurityConfigurer接口,或者继承自WebSecurityConfigurerAdapter。 - 一般会选择继承
WebSecurityConfigurerAdapter抽象类来使用SpringSecurity的默认配置,并且重写configure(AuthenticationManagerBuilder auth) 和 configure(HttpSecurity http)这两个方法来进行客户化配置。
下面为SpringSecurity配置的例子:
@Configuration
@EnableWebSecurity
public class WebSecurityConfig extends WebSecurityConfigurerAdapter {

    @AutoWired
    private UserDetailsService myUserDetailsService;

    @Override
    protected void configure(HttpSecurity http) throws Exception {
        http
            .authorizeRequests()
                .antMatchers("/", "/home").permitAll()
                .anyRequest().authenticated()
                .and()
            .formLogin()
                .loginPage("/login")
                .permitAll()
                .and()
            .logout()
                .permitAll();
    }

    @Override
    protected void configure(AuthenticationManagerBuilder builder) throws Exception{
        builder.userDetailsService(myUserDetailsService)
                .passwordEncoder(passwordEncoder());
    }

    @Bean
    public BCryptPasswordEncoder passwordEncoder(){
        return new BCryptPasswordEncoder();
    }
}
其中configure(HttpSecurity)方法主要负责配置资源和URL的权限控制,即配置哪些资源或URL需要授权(狭义上就是登入)以后才能访问,哪些资源或URL可以自由访问。具体以上面的例子来说,"/"和"/home"下的资源被配置为不需要进行任何身份验证即可访问,其他路径下的资源访问必须先经过身份验证;开启了表单登入功能,登入页面为"/login"也不需要进行身份验证即可访问,当未授权对需要授权资源进行访问时会跳转到指定的登入界面。
而configure(AuthenticationManagerBuilder)方法从参数名就可以看出该方法对AuthenticationManagerBuilder进行配置,它可以使用内存方式(in-memory)、JDBC 或 LDAP、或自定义的UserDetailService来认证用户,从而影响到AuthenticationManager的属性。上面的例子中配置了授权认证过程的UserDetailsService对象以及密码加密对象,即在基于数据库的登入验证部分DaoAuthenticationProvider获得的UserDetailsService在这里被设置了。你也可以通过以下方式直接对DaoAuthenticationProvider进行配置:
@Configuration
@EnableWebSecurity
public class SecurityConfiguration extends WebSecurityConfigurerAdapter {

    private final UserDetailsService userDetailsService;

    @Autowired
    public SecurityConfiguration(@Qualifier("userService") UserDetailsService userDetailsService) {
        this.userDetailsService = userDetailsService;
    }

    @Autowired
    public void configureGlobal(AuthenticationManagerBuilder auth, PasswordEncoder passwordEncoder) throws Exception {
        // 设置身份验证器
        DaoAuthenticationProvider authenticationProvider = new DaoAuthenticationProvider();
        authenticationProvider.setUserDetailsService(userDetailsService);// 设置用户服务类
        authenticationProvider.setPasswordEncoder(passwordEncoder); // 设置密码加密方式

        auth.authenticationProvider(authenticationProvider);//设置authenticationProvider
    }

    ...//其他配置省略
}
UserDetailsService实际上只是一个接口,其中定义了#loadUserByUsername方法用于返回用户信息,因此我们可以让UserService实现该接口,如下:
@Service
public class UserService implements UserDetailsService {

    ...//省略其他方法

    @Override
    public UserDetails loadUserByUsername(String username) throws UsernameNotFoundException {
        if(username == null){
            throw new UsernameNotFoundException("用户名不能为空");
        }
        return userDao.findByName(username);
    }
}
上述配置完成后,SpringSecurity与数据库对象之间就建立了联系,当用户进行资源访问时会先去数据库获得该对象进行比对,判断是否有权限获得相应的资源。
SpringSecurity中的访问控制
在Spring Security中默认的访问控制的入口为FilterSecurityInterceptor过滤器,在Spring Security的过滤器链中该过滤器负责角色和权限的控制。
FilterSecurityInterceptor继承自AbstractSecurityInterceptor并且实现了Filter接口,该类的主要作用是作为Filter加入过滤链,主要的权限控制逻辑由AbstractSecurityInterceptor实现。它的doFilter方法,如下:
/**
 *使用request,response,filterChain构建FilterInvocation对象并传给invoke方法
 */
public void doFilter(ServletRequest request, ServletResponse response,
            FilterChain chain) throws IOException, ServletException {
        FilterInvocation fi = new FilterInvocation(request, response, chain);
        invoke(fi);
}
从上面的代码可以看出,#invoke方法为权限验证的入口,代码如下:
/**
 *先判断是否已经进行了权限验证
 *如果没有进行过权限验证,则调用父类的beforeInvocation方法
 */
public void invoke(FilterInvocation fi) throws IOException, ServletException {
    if ((fi.getRequest() != null)
        && (fi.getRequest().getAttribute(FILTER_APPLIED) != null)
        && observeOncePerRequest) {
        // filter already applied to this request and user wants us to observe
        // once-per-request handling, so don't re-do security checking
        fi.getChain().doFilter(fi.getRequest(), fi.getResponse());
    }
    else {
        // first time this request being called, so perform security checking
        if (fi.getRequest() != null && observeOncePerRequest) {
            fi.getRequest().setAttribute(FILTER_APPLIED, Boolean.TRUE);
        }

        //beforeInvocation为关键方法
        //若该方法未抛出RuntimeException则说明权限认证成功,即使返回null对象
        InterceptorStatusToken token = super.beforeInvocation(fi);

        try {
            fi.getChain().doFilter(fi.getRequest(), fi.getResponse());
        }
        finally {
            super.finallyInvocation(token);
        }

        super.afterInvocation(token, null);
    }
}
从上面的代码中可以看出,该方法只是做了是否需要权限认证的判断工作,而主要的认证工作交给了父类的#beforeInvocation方法。这里有一个问题,request对象在每次请求时都会由Web容器重新创建,为什么上面的代码要进行一次是否已经进行权限认证的工作呢?猜测是考虑进行了请求转发的情况下,不需要的重新进行权限认证。继续往下看,AbstractSecurityInterceptor的#beforeInvocation方法如下:
/**
 *1.判断是否配置了支持传入对象的认证,若不支持则抛出异常
 *2.获得SecurityMetadataSource的Attributes,Attributes中包含了本次请求(request)所需的权限级别
 *3.判断是否需要进行登入认证,并返回Authentication对象
 *4.调用AccessDecisionManager.decide()方法进行权限验证
 */
protected InterceptorStatusToken beforeInvocation(Object object) {
    Assert.notNull(object, "Object was null");
    final boolean debug = logger.isDebugEnabled();

    if (!getSecureObjectClass().isAssignableFrom(object.getClass())) {
        throw new IllegalArgumentException(
            "Security invocation attempted for object "
            + object.getClass().getName()
            + " but AbstractSecurityInterceptor only configured to support secure objects of type: "
            + getSecureObjectClass());
    }

    //通过SecurityMetadataSource获得本次请求需要的权限
    //权限是在SecurityConfiguration中由hasAnyAuthority、hasAnyRole或hasRole方法配置的
    Collection<ConfigAttribute> attributes = this.obtainSecurityMetadataSource()
        .getAttributes(object);

    if (attributes == null || attributes.isEmpty()) {
        if (rejectPublicInvocations) {
            throw new IllegalArgumentException(
                "Secure object invocation "
                + object
                + " was denied as public invocations are not allowed via this interceptor. "
                + "This indicates a configuration error because the "
                + "rejectPublicInvocations property is set to 'true'");
        }

        if (debug) {
            logger.debug("Public object - authentication not attempted");
        }

        publishEvent(new PublicInvocationEvent(object));

        return null; // no further work post-invocation
    }

    if (debug) {
        logger.debug("Secure object: " + object + "; Attributes: " + attributes);
    }

    if (SecurityContextHolder.getContext().getAuthentication() == null) {
        credentialsNotFound(messages.getMessage(
            "AbstractSecurityInterceptor.authenticationNotFound",
            "An Authentication object was not found in the SecurityContext"),
                            object, attributes);
    }

    // 判断是否需要进行登入认证,若需要则进行认证并返回Authentication对象,主要作用是返回Authentication对象
    Authentication authenticated = authenticateIfRequired();

    // Attempt authorization
    try {
        //权限验证的核心方法,调用AccessDecisionManager的decide方法进行权限认证,未抛出异常说明有权限
        this.accessDecisionManager.decide(authenticated, object, attributes);
    }
    catch (AccessDeniedException accessDeniedException) {
        publishEvent(new AuthorizationFailureEvent(object, attributes, authenticated,
                                                   accessDeniedException));

        throw accessDeniedException;
    }

    if (debug) {
        logger.debug("Authorization successful");
    }

    if (publishAuthorizationSuccess) {
        publishEvent(new AuthorizedEvent(object, attributes, authenticated));
    }

    // Attempt to run as a different user
    Authentication runAs = this.runAsManager.buildRunAs(authenticated, object,
                                                        attributes);

    if (runAs == null) {
        if (debug) {
            logger.debug("RunAsManager did not change Authentication object");
        }

        // no further work post-invocation
        return new InterceptorStatusToken(SecurityContextHolder.getContext(), false,
                                          attributes, object);
    }
    else {
        if (debug) {
            logger.debug("Switching to RunAs Authentication: " + runAs);
        }

        SecurityContext origCtx = SecurityContextHolder.getContext();
        SecurityContextHolder.setContext(SecurityContextHolder.createEmptyContext());
        SecurityContextHolder.getContext().setAuthentication(runAs);

        // need to revert to token.Authenticated post-invocation
        return new InterceptorStatusToken(origCtx, true, attributes, object);
    }
}
从上面代码可以看出权限验证的核心方法为AccessDecisionManager#decide,#decide方法接口代码如下:
void decide(Authentication authentication, Object object,
            Collection<ConfigAttribute> configAttributes) throws AccessDeniedException,
            InsufficientAuthenticationException;
显而易见该方法需要传入三个参数:
Authentication,在登入认证完成后返回的凭证,确定访问当前资源的用户,并且从凭证可以获取当前用户所拥有的权限(需要在UserDetailsService#loadUserByUsername方法中设置)。Object,实际上为FilterInvocation对象它持有request对象的引用,即当前被访问的资源。Collection<ConfigAttribute>,访问资源要求的权限,在SpringSecurity配置中进行设置。
所以AccessDecisionManager的#decide方法的主要思路是从Authentication获得当前用户所拥有的权限,再与访问当前资源(object)所需要的权限进行比对,即可判断当前认证用户是否能够访问该资源。
Spring Security引入了投票器(voter)的概念,真正的权限认证工作由AccessDecisionManager中的一组AccessDecisionVoter来实现,有无权限访问的最终觉得权是由投票器来决定的。AccessDecisionManager维护着一个AccessDecisionVoter列表参与授权的投票。根据处理投票的策略不同Spring Security中AccessDecisionManager有3个不同的实现:
- UnanimousBased(全票通过):所有投票器都通过才允许访问资源。
- ConsensusBased(少数服从多数):超过一半的投票器通过才允许访问资源。
- AffirmativeBased(一票通过):只要有一个投票器投票通过,就允许访问资源。AffirmativeBased为默认的AccessDecisionManager。
下面以AffirmativeBased的#decide方法为例进行简要说明,代码如下:
public void decide(Authentication authentication, Object object,
            Collection<ConfigAttribute> configAttributes) throws AccessDeniedException {
        int deny = 0;

        //遍历voter列表,循环调用vote的方法
        for (AccessDecisionVoter voter : getDecisionVoters()) {
            int result = voter.vote(authentication, object, configAttributes);

            if (logger.isDebugEnabled()) {
                logger.debug("Voter: " + voter + ", returned: " + result);
            }

            switch (result) {
            case AccessDecisionVoter.ACCESS_GRANTED:
                return; //当有result为ACCESS_GRANTED则权限认证成功

            case AccessDecisionVoter.ACCESS_DENIED:
                deny++;

                break;

            default:
                break;
            }
        }

        if (deny > 0) {
            throw new AccessDeniedException(messages.getMessage(
                    "AbstractAccessDecisionManager.accessDenied", "Access is denied"));
        }

        // To get this far, every AccessDecisionVoter abstained
        checkAllowIfAllAbstainDecisions();
    }
可以看出#decide方法只是循环调用了AccessDecisionVoter的#vote,该方法会返回一个投票结果,当有一个voter的投票结果为ACCESS_GRANTED时,则权限认证成功;如果所有的投票结果中都没有ACCESS_GRANTED时,抛出AccessDeniedException异常表明认证失败。
Spring Security提供几个缺省的AccessDecisionVoter,它们分别对应不同的SpringSecurity配置,下面对常用的两个投票器进行说明:
- RoleVoter,最常见的投票器,在RoleVoter中定义了权限的前缀(默认为"ROLE_"),当配置中有以权限前缀开头的配置时
#vote方法才会进行投票,否则弃权。 - AuthenticatedVoter,当配置中有以下配置时才会进行投票,否则弃权:
- IS_AUTHENTICATED_ANONYMOUSLY 允许匿名用户访问
- IS_AUTHENTICATED_FULLY 允许登录用户访问
- IS_AUTHENTICATED_REMEMBERED 允许登录用户和rememberMe用户访问
在SpringBoot中使用SpringSecurity进行权限控制
从源码中可以得出结论,SpringSecurity的权限控制需要使用者做的工作至少有以下两个:
- 配置访问具体的URL需要的角色或者权限;
- 在用户登入验证时,将其拥有的权限交给
UserDetails对象。
下面将使用SpringBoot + SpringDataJPA + SpringSecurity为技术框架进行一个简单说明。
SysUser为系统用户对象,其角色使用枚举类RoleType表示,并且存在数据库中。
@Entity(name = "user")
public class SysUser {

    @Id
    @GenericGenerator(name = "uuid2", strategy = "org.hibernate.id.UUIDGenerator")
    @GeneratedValue(generator = "uuid2")
    @Column(name = "user_uuid", columnDefinition = "uuid")
    private UUID uuid;

    @Column(name = "user_name", unique = true, nullable = false, length = 64)
    protected String username;

    @Column(name = "role_type", nullable = false)
    @Enumerated(EnumType.STRING)
    protected RoleType role;

    @Column(name = "password")
    private String password;

    //getter、setter
}
RoleType为枚举类,在系统中代表用户的角色类型。
public enum RoleType {

    SUPER_ADMIN(0,"超级管理员","super_admin",true,true),
    ADMIN(1,"管理员","admin",true,true),
    GUEST(99,"游客","guest", false, false);

    private int value;
    private String name;
    private String roleName;
    private boolean isLogin;
    private boolean isAdmin;
}
UserService是系统获取用户信息的Service类,实现的SpringSecurity的UserDetailsService接口,它实现了#loadUserByUsername方法是SpringSecurity实现登入和权限认证的关键方法,需要返回User的具体信息(包括权限)。
@Service
public class UserDetailService implements UserDetailsService {

    private final UserRepository userRepository; //在JPA中相当于dao,这里不展开说明

    @Autowired
    public UserDetailService(UserRepository userRepository){
        this.repository = userRepository;
    }

    public UserDetails loadUserByUsername(String username) throws UsernameNotFoundException {

        SysUser user = repository.findUserByUsername(username);
        if (user==null)
            throw new UsernameNotFoundException("用户名或密码错误"); //抛出异常,会根据配置跳到登录失败页面
        List<GrantedAuthority> authorities = getRoles(user); //获取用户权限

        org.springframework.security.core.userdetails.User
            auth_user = new org.springframework.security.core.userdetails.User(user.getUsername(), user.getPassword(), list);      //将权限传递给UserDetails
        return auth_user;
    }

    /**根据用户返回他的权限列表*/
    public List<GrantedAuthority> getRoles(SysUser user){
        List<GrantedAuthority> authorities = new ArrayList<>();
        //SpringSecurity对角色的认证需要以"ROLE_"作为开头,可以设置
        String role = "ROLE_" + user.getRoleType().name();
        authorities.add(new SimpleGrantedAuthority(role));
        return authorities;
    }
}
配置SpringSecurity
在SpringBoot中可以通过继承WebSecurityConfigurerAdapter类并使用@Configuration和@EnableWebSecurity注解来配置SpringSecurity,如下:
@Configuration
@EnableWebSecurity
public class WebSecurityConfig extends WebSecurityConfigurerAdapter{

    @Autowired
    private UserDetailService userDetailService;//即我们实现的UserService

    @Override
    protected void configure(HttpSecurity http) throws Exception {
        http.authorizeRequests()
                    //管理员页面只允许拥有ADMIN,SUPER_ADMIN角色的用户访问
                    //这里的"ADMIN"不需要加"ROLE_"前缀是因为hasAnyRole方法会默认添加"ROLE_"前缀
                    .antMatchers("/admin.html").hasAnyRole("ADMIN","SUPER_ADMIN")
                    .anyRequest()
                        .authenticated()
                        .accessDecisionManager(buildDecisionManager())
                    .and()
                .formLogin()
                    //登入页面,为登入时会跳转到该页面
                    .loginPage("/login.html")
                    .permitAll()
                    //SpringSecurity接受登入请求的url,默认为"/login"
                    .loginProcessingUrl("/login")
                    .and()
                .logout()
                      //SpringSecurity接受登出请求的url,默认为"/logout"
            .logoutUrl("/logout")
                      .permitAll();
    }


    @Override
    protected void configure(AuthenticationManagerBuilder auth) throws Exception {
        auth.userDetailsService(userDetailService); //配置自定义userDetailService
    }

    @Bean
    public AccessDecisionManager buildDecisionManager() {
        //对AccessDecisionManager进行客户化配置
        //这里使用AffirmativeBased(一票通过)管理器
        //并且只配置了RoleVoter,只进行角色限制
        List<AccessDecisionVoter<? extends Object>> decisionVoters = Arrays.asList(new RoleVoter());
        return new AffirmativeBased(decisionVoters);
    }

}
如上配置类所示,我们对admin.html的访问加了角色限制,只有为角色"ADMIN"或"SUPER_ADMIN"的用户可以访问该页面,并且对AccessDecisionManager客户化的配置,权限管理器使用了AffirmativeBased并且它的投票者只有RoleVoter。
SpringSecurity权限控制相关注解
参考
http://www.spring4all.com/article/420
https://elim.iteye.com/blog/2247057